Client Hyper-V is a virtual machine app for Windows OS that was introduced for the first time on Windows 11.
What is Client Hyper-V?
Client Hyper-V is a tool included in Windows 11 provides a flexible and high-performing client virtualization environment. You can use this environment to test applications and IT scenarios in multiple operating system configurations. Using Client Hyper-V, IT departments can provide a consolidated and efficient virtual environment through virtual-machine compatibility with Windows Server.
A different but related Windows tool is Windows Sandbox, that allows to run an application in an isolated virtual machine. It allows Windows clients to set up an isolated environment without the need to configure Hyper-V or create a Windows VM or set up a VHD. This enables the user to quickly start an isolated, pristine Windows environment for temporary use scenarios such as launching a downloaded executable that you may not fully trust. Sandbox also provides a disposable environment so that nothing persists on the device. When Sandbox is closed, everything is discarded. It was first introduce in Windows 10.
Steps to enable Client Hyper-V on Windows 11 Pro
Steps to enable Hyper-V on Windows 11 Pro
- Check for Hyper-V Compatibility
- Consider compatibility aspects with other virtual machines
- Enable Hyper-V
Check for Hyper-V Compatibility
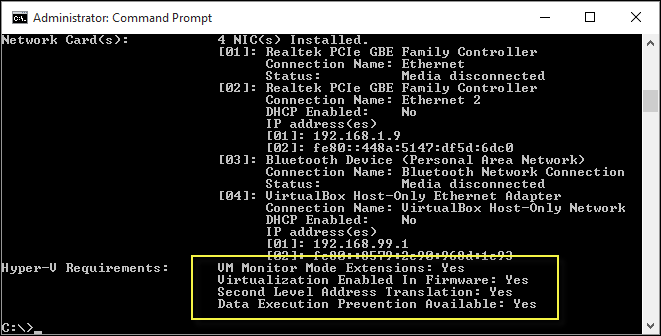
To verify compatibility, open PowerShell window or a command prompt and run systeminfo.exe. If all listed Hyper-V requirements have a value of “Yes”, your system can run the Hyper-V role. Below you can see the hardware requirements highlighted above are checked when systeminfo.exe is run.
If Hyper-V is already enabled on the system, you will see the following message from systeminfo.exe:
Hyper-V Requirements: A hypervisor has been detected. Features required for Hyper-V will not be displayed.For more information on Hyper-V compatibility, you can see this link.
Consider compatibility aspects with other virtual machines
There are other virtual machines like VMWare Oracle VM VirtualBox.
Some Windows 11 features like “Memory Integrity” prevent these third-party apps to work.
See this external link for more info.
Enable Hyper-V
Click start on Windows 11 and type “Turn Windows features on or off”.
You will find a tree displaying features. There is one branch called “Hyper-V”. You can select all or some components. Click “OK”.
Wait for the wizard to perform all operations.
You may need to restart to apply changes.
You might also be interested in…
External References
- Microsoft; “Explore client virtualization“; Microsoft
[…] Enable Hyper-V on Windows 11 Pro […]